
If you’re a WordPress user looking to manage multiple websites from one central location, enabling WordPress multisite is an excellent option. Multisite allows you to run multiple sites from one WordPress installation, which makes it easy to manage and maintain multiple sites at once. In this blog post, we’ll show you how to enable multisite in WordPress and set up your network.
Step 1: Check Hosting Requirements
The first step in enabling WordPress multisite is to make sure your hosting provider supports it. Many web hosts do, but some don’t, so it’s important to check with your host or review their documentation to ensure that your server meets the minimum requirements.
WordPress recommends that your server configuration includes:
- Apache or Nginx web server
- MySQL version 5.6 or higher, or MariaDB version 10.1 or higher
- PHP version 7.4 or higher
In addition, you’ll need to have access to your server’s filesystem and be able to modify the wp-config.php and .htaccess files.
Step 2: Backup Your Site
Before making any changes to your WordPress installation, it’s always a good idea to back up your site. This way, you can restore your site to its previous state if anything goes wrong.
You can use a plugin like UpdraftPlus or Jetpack to create a backup of your site, or you can manually back up your site by copying all of your files and exporting your database.
Step 3: Edit wp-config.php File
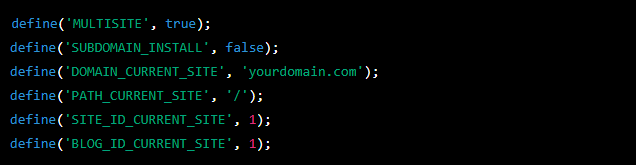
Once you’ve backed up your site, you’ll need to edit the wp-config.php file to enable multisite. This file is located in the root directory of your WordPress installation.
Open the wp-config.php file in a text editor and add the following code just before the line that says /* That’s all, stop editing! Happy blogging. */:

Save the file and close it.
Step 4: Install WordPress Multisite
Next, log in to your WordPress dashboard and navigate to Tools > Network Setup. This will launch the multisite installation wizard.
On the Network Setup page, you’ll be prompted to choose between subdomains and subdirectories for your network’s structure. Subdomains allow you to create separate sites using a subdomain, such as site1.yoursite.com and site2.yoursite.com. Subdirectories allow you to create separate sites using a subdirectory, such as yoursite.com/site1 and yoursite.com/site2.
Choose the structure that best suits your needs, then fill in the rest of the required information, such as the title of your network and your network admin email address.
Click the Install button to complete the installation. You’ll be prompted to update your wp-config.php and .htaccess files with the new code.
Step 5: Update wp-config.php and .htaccess Files
Open the wp-config.php file in a text editor and add the following code just after the line that says /* That’s all, stop editing! Happy blogging. */:
Make sure to replace ‘yourdomain.com’ with your actual domain name.
Next, open the .htaccess file in a text editor and replace the existing code with the following:

Save the files and close them.
Step 6: Log In to Your Network Admin Dashboard
To access your network admin dashboard, log in to your WordPress dashboard and click on My Sites.
You should see a new option for Network Admin. Click on it to go to the network admin dashboard.
From here, you can manage all of the sites in your network, including creating new sites, managing users, and installing plugins and themes.
Step 7: Create New Sites
To create a new site in your network, click on Sites in the network admin dashboard. You should see a list of all the sites in your network.
To add a new site, click on the Add New button at the top of the page. Fill in the required information, such as the site title and site address, then click on the Add Site button.
You can also add new sites directly from the network admin dashboard by clicking on the Sites > Add New link in the left-hand menu.
Step 8: Install Plugins and Themes
One of the benefits of using WordPress multisite is that you can install plugins and themes for all of the sites in your network from one central location.
To install a plugin or theme for your network, go to the network admin dashboard and click on the Plugins or Themes link in the left-hand menu. From here, you can search for and install new plugins and themes.
Once a plugin or theme is installed, you can activate it for all of the sites in your network or for specific sites.
Step 9: Manage Users
As the network admin, you have the ability to manage all of the users in your network. To do so, go to the network admin dashboard and click on the Users link in the left-hand menu.
From here, you can add new users, delete users, and edit user profiles. You can also assign users to specific sites and set their roles and permissions.
Step 10: Customize Your Network
Finally, you can customize your network by adding your own branding and styling. To do so, you can create a custom theme or install a plugin that allows you to customize the network’s appearance.
You can also add custom code to your network by adding it to the functions.php file of your active theme or by using a plugin like Code Snippets.
Conclusion
Enabling multisite in WordPress can be a powerful way to manage multiple sites from one central location. With just a few simple steps, you can create a network of sites that share the same WordPress installation, plugins, and themes. Whether you’re managing multiple sites for yourself or for clients, multisite can save you time and make site management much more efficient.
If you need any help regarding WordPress Development, contact us.


No comment yet, add your voice below!